The Rise Of The Chocolate Bomb
Ever heard of a chocolate bomb?
If not, you are not alone. We only learned about them fairly recently.
If you have, lucky you! You have already tasted one or many and perhaps made them yourself.

Chocolate Bomb Made By Purple Pig Interiors
So, what actually is a chocolate bomb?
Chocolate bombs are spheres of chocolate, hollow and filled with marshmallows, cocoa, sprinkles, or other goodies. Combined with steamy hot milk they form a delightful explosion of yummy goodness. Super decorative they are definitely a conversation item.
Chocolate bombs appeal to our senses by smelling delicious, by looking very attractive, by being creative and ready to be devoured. They tease our taste buds with their rich yet delicate flavours. Not to mention what fun it is to see the ‘explosion’ of marshmallows!
Invented by chocolatier Debbas in Fresno, California, chocolate bombs have gone viral on TikTok since the pandemic began. People were home and many started to experiment with new hobbies, new books, new recipes...... And some found chocolate bombs, made videos and posted them on TikTok. Soon, a new rage was born.
With Valentine’s Day just around the corner, what would be better than making your own bombs for someone you love! We decided to test these little treasures by using our own recipe.
The result: fantastic chocolate bombs that are easy to make and a delight for the eye, nose, and tastebuds.
How To Make a Chocolate Bomb
A chocolate bomb consists of two half-spheres made in a mold. One half is filled with a mixture of a chocolate powder mix and mini marshmallows. The second half is placed on top of the other and then fused to the bottom half-sphere by warming up the chocolate rims of the two halves.
Once the sphere is formed, it can be decorated by adding chocolate or frosted piping. Edible sprinkles, chocolate leaves, candy, or any other cake decoration can be applied to make a fun design or loving message.
While the typical chocolate bomb is a sphere, it can also be made with other forms, such as hearts, stars, moons. In essence, any type of form can be made into a chocolate bomb, as long as you have two halves that can be filled and fused together. Make sure your form is flexible so you can get the half-spheres out!
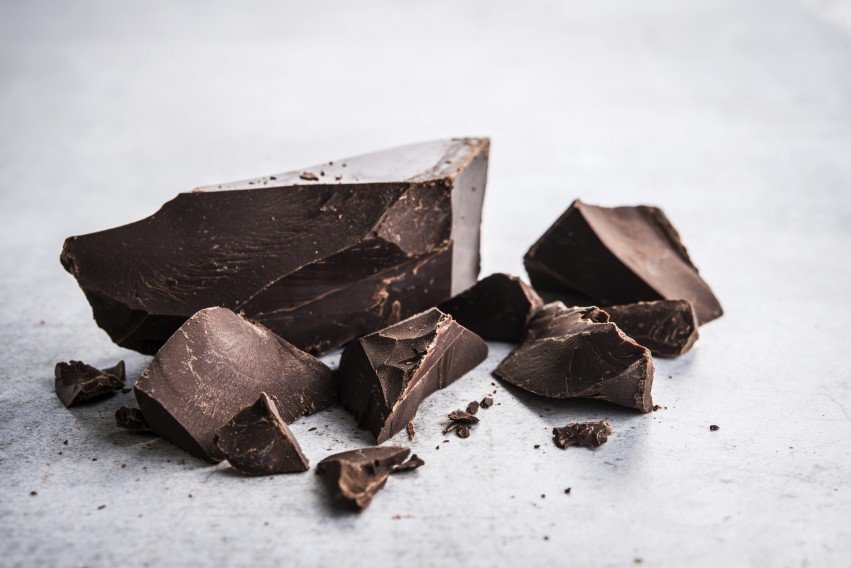
Callebaut Dark Couverture Chocolat
Since the chocolate is to be melted it is recommended to use high-quality chocolate. Chocolatiers like to use couverture chocolate. A class of high-quality chocolate, couverture chocolate is perfect for melting. In order to be called couverture chocolate, it must have a minimum of 35% cocoa solids and 31% cocoa butter. The higher percentage of cocoa butter the better the chocolate will melt and the more fluid it is (up to 39%). Lindt and Callebaut are two examples of chocolatiers that use couverture chocolate.
Tools You Will Need
Glass bowl to melt the chocolate
Roll of parchment paper to place the half-spheres on
Thermometer to test the temperature of the chocolate (optional)
Double boiler (optional)
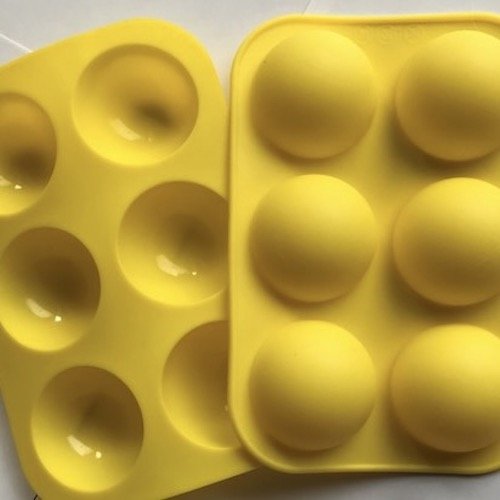
Two silicone half-sphere molds with 6 cavities each (see image below). The diameter of the cavities of our mold is about 2”.
Small silicone brush or a clean spoon
One plate
Piping bag
Gloves
White or coloured cup holders for display
Mugs to fit your bomb
Buy the following tools and ingredients on Amazon. Double click on the image and it will take you straight to the Amazon site. Full disclosure: we earn a tiny commission on any of these items when purchased via Amazon. The good news: you do not pay more at all! We just get a wee part of the left-over scrappings!


Ingredients To Make 6 Spheres
2 cups semi-sweet high-quality chocolate, such as Lindt or Callebaut, cut into thick chunks (see above)
6 tbsp mini marshmallows, white or coloured
6 tbsp hot chocolate mix powder (see below)
Sprinkles
Icing for decorating
Whole milk, steaming hot and ready to pour over the bomb
Chocolate Mix Powder

Chocolate Powder Mix - Purple Pig Interiors
You can either make your own powder or use a purchased, prepared hot chocolate powder mix (to make hot chocolate). We made our own by mixing the following together using a food processor. Don’t have a food processor? No problem, just shake the ingredients in a closed jar.
6 tbsp cocoa powder
2/3 cup of brown or white sugar (amount of sugar can be reduced to make the mix less sweet)
Pinch of cinnamon
Pinch of salt
Step by Step Preparation
Have all your tools and ingredients ready to go to make the process easy and smooth.
Step 1 - Melting the Chocolate
Microwave Option:
Melt the chocolate chunks all at once. Place the chunks in the glass bowl and microwave on medium for 25 seconds. Take the bowl out and stir with a silicone spatula to check how far your chocolate has melted. Repeat for another 20 seconds. The chocolate should have melted by now.
You may have to experiment with the melting times. If your chunks are large it will take a few seconds longer as opposed to thin chunks. It is best to microwave for fewer seconds at a time with stirring in-between than trying to do it all in one go.

Purple Pig Interiors
It is easy to burn the chocolate by overheating. So be careful.
It is also easy to ruin your chocolate when steam from the microwave comes in touch with your melting chocolate. Only a medium setting and short intervals will avoid this!
When any type of liquid (water or steam) meets the chocolate, it is no longer usable. Chocolate is considered a dry ingredient (even in the melted form!) and adding a liquid will make it act like flour and water. So avoid liquids in your chocolate and be particularly careful with steam in the microwave. This reaction is called ‘seizing’. It will spoil your chocolate.

Purple Pig Interiors
Stovetop Option:
Melt the chocolate in a double-boiler on medium heat. Use the thermometer to check the temperature, which needs to be between 88-90 F or 31.1 to 32.2 Celsius. This melting procedure takes a little bit more time but is so worth it since the chocolate will have a creamier consistency.
Both methods provide enough melted chocolate to not only fill the spheres but also for fusing the half-spheres together.
Step 2 - Filling the Mold
Scoop about 1 tbsp of melted chocolate into each mold cavity. Using the small flat brush or the back of the spoon, spread the chocolate evenly along the sides of the cavity. Make sure the top edge of the shells are thick enough to prevent breaking.
After filling the cavities, place the mold in the fridge for about 20 minutes to set the chocolate. You can also place it in the freezer for 15-20 minutes. Make sure the mold rests on an even, flat surface
Once the chocolate has set, repeat this process to add a second layer. Place back in fridge or freezer. A third layer could be added if you prefer a thicker shell of chocolate.
After the chocolate has set, slowly and gently release the half-spheres out of the mold by manipulating the corner edge of the mold. The spheres are now ready to be completed. See the sequence below.


Step 3 - Filling the Half Spheres
Fill each of the six half spheres with 1 tbsp of chocolate mix powder and 1 tbsp of marshmallows. Set aside.
Warm a plate in the microwave for about 35 seconds. Melt the edges of the next six chocolate half-spheres by placing one at a time on the warmed-up plate for a few seconds making sure the edge is flat. Place this empty half-sphere on a filled one. Gently press the two halves together using plastic gloves to avoid fingerprinting the outside of the sphere. Use a bit of the warm chocolate to gently fuse the two half-spheres together. This is also the time to roll the sphere in sprinkles to cover them if so desired.
By using two silicone molds with 6 cavities each, you will end up with six chocolate bombs.

Half-sphere filled with chocolate powder mix

Marshmallows on top of chocolate powder mix
Step 4 - Decorating the Bombs
The fun part begins!
Place the bombs on parchment paper or in an egg holder and start decorating. Use the piping bag to decorate with white or coloured frosting. For Valentine’s Day, you could add hearts, cupids, a bow and arrow, flowers, or anything that strikes your fancy. Get creative and have fun! Place the decorated bombs in a paper cup holder. Put them in a basket, box, or cellophane paper and gift your loved ones.

Ready to be consumed….. Purple Pig Interiors
How to Use a Chocolate Bomb
This is the easiest and most rewarding part! Take the mugs and place a bomb at the bottom. Heat up the milk so that it is steaming hot. Pour the milk over the bomb and watch the bomb explode with marshmallows, sprinkles, chocolate, and oh so much flavour! See our video below.
How Long Do Chocolate Bombs Last?
Your bombs are room-stable enough in an air-tight container for about two months. Refrigeration is not required.
Can You Freeze Chocolate Bombs?
Yes, you can! We do recommend wrapping each bomb carefully in two layers of saran wrap and a layer of aluminum foil. Place the wrapped bombs in an air-tight container and keep them for up to 6 months.
Let us know how you did! Send us your photos and we will include them in a follow-up post.
*****
If you have any questions or comments please leave them in the comment section below. We will get back to you promptly.
Blue skies,
Jessica & Loretta